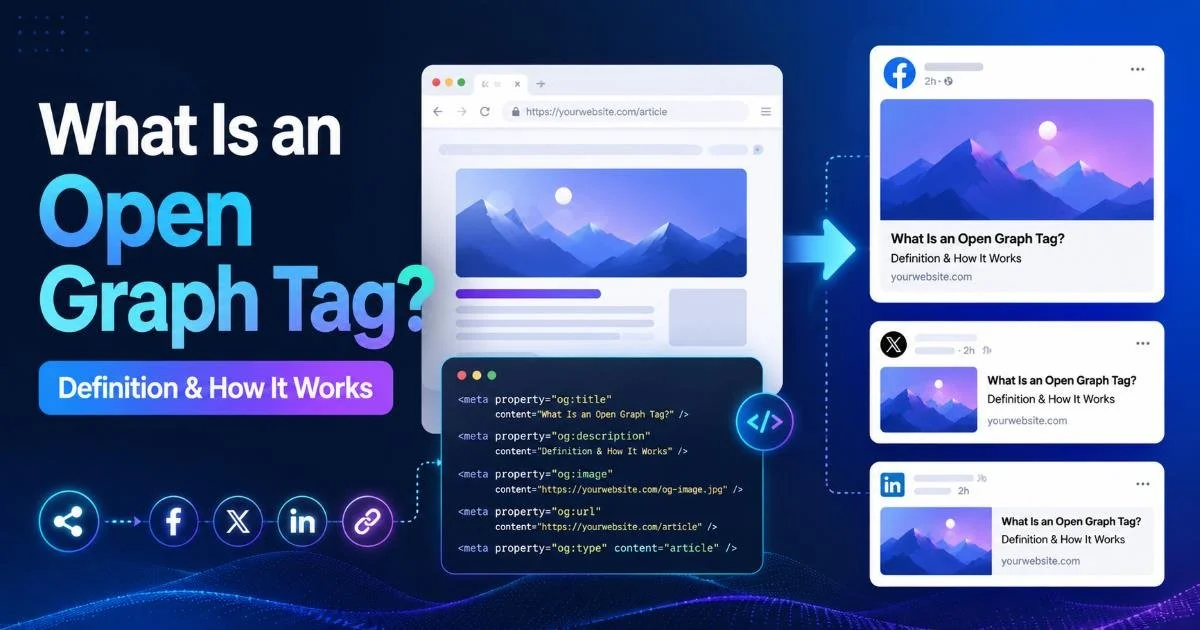
An open graph tag checker is one of those tools that every web developer and SEO specialist should know how to use properly. When you share a link on Facebook, LinkedIn, Twitter, or Slack, the platform reads your page's OG tags to generate a visual preview card. If those tags are missing, malformed, or pointing to broken images, your carefully crafted content looks unprofessional or, worse, invisible.
A proper metadata validator and social media preview tool lets you catch these problems before your audience does. The stakes are real: pages with optimized link previews see measurably higher click-through rates than those with generic or broken cards.
Understanding how Open Graph tags work and what they actually define is the foundation, but knowing how to validate them step by step is where the practical value lives. This guide walks you through the entire process, from entering a URL to fixing the issues your checker flags.
Key Takeaways
- Always validate OG tags before sharing links on any social media platform.
- Check that og:image dimensions meet each platform's minimum size requirements.
- Use a dedicated checker tool rather than relying on manual source code inspection.
- Re-scrape your URL after making fixes to confirm changes are live.
- Test across multiple platforms because each one parses metadata slightly differently.
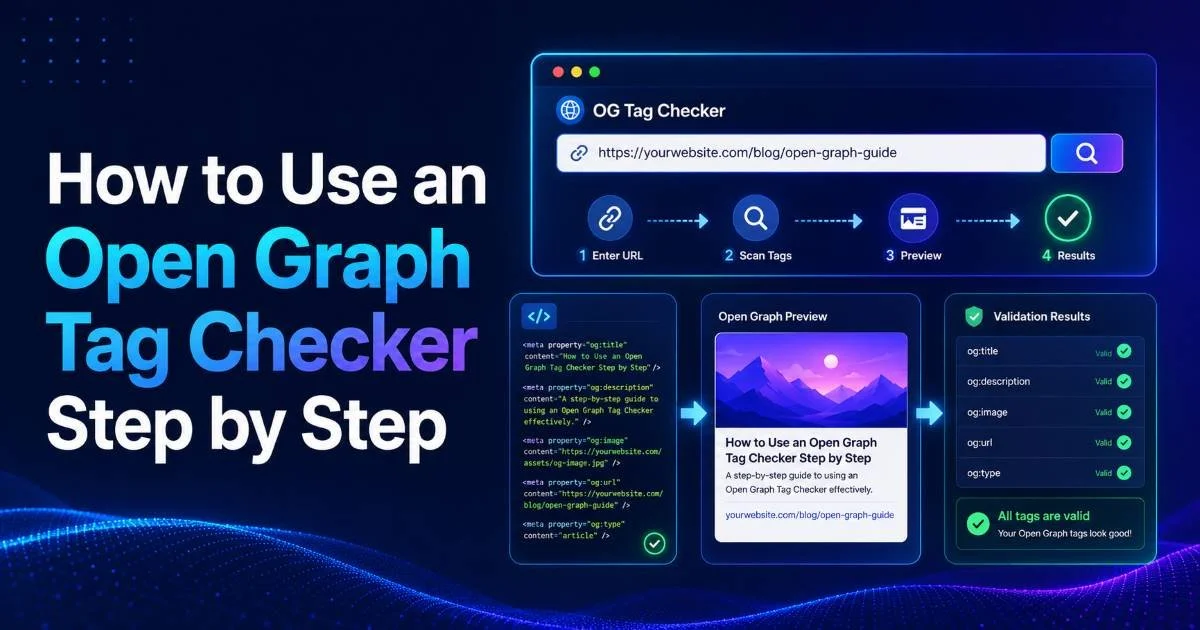
Step 1: Choose Your OG Tag Checker
The first step is selecting the right open graph tag checker for your workflow. You have several options ranging from browser-based tools to platform-specific debuggers. A tool like OG Checker gives you an instant visual preview alongside raw tag data, while Facebook's Sharing Debugger and Twitter's Card Validator focus on their respective platforms. For most developers and SEO specialists, starting with a general-purpose validator makes sense because it gives you a platform-agnostic baseline before you test on individual networks.
What to Look for in a Tool
Not all checkers are built equally. The best ones show you both a rendered preview (what the card will actually look like) and the raw metadata extracted from your page's HTML. Some tools also flag warnings for missing recommended tags, oversized or undersized images, and character count issues in titles and descriptions. Look for a tool that fetches your page in real time rather than relying on cached data, especially during active development cycles.
Choose a checker that displays both the raw meta tags and a visual card preview simultaneously.
Speed matters too. If you are auditing dozens or hundreds of pages, you need a tool that returns results within seconds. Some enterprise-grade SEO platforms include OG tag validation as part of larger site audits, which can be useful for bulk checking. For one-off checks during content publishing, a lightweight browser-based tool is faster and more practical. At the end of this step, you should have your chosen tool open and ready to accept a URL.
Step 2: Enter Your URL and Run the Scan
With your checker selected, paste the full URL of the page you want to validate into the input field and hit scan. Make sure you use the exact URL your audience will encounter, including the correct protocol (https vs. http) and any trailing slashes. A common mistake is testing a staging URL instead of the production URL; OG tags can differ between environments if your CMS or build system handles them dynamically. The scan typically takes one to three seconds.
Reading the Results
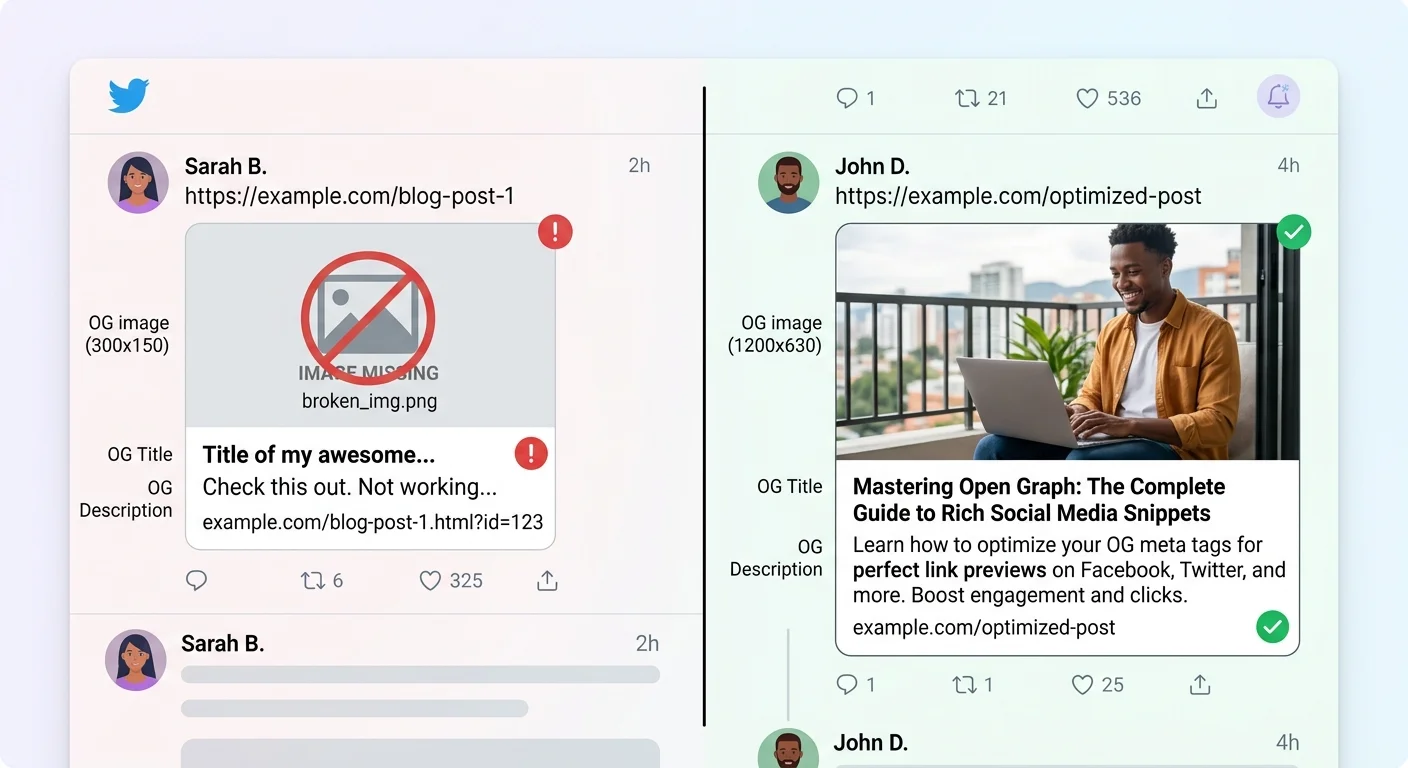
Once the scan completes, you should see a list of detected Open Graph meta tags pulled from your page's <head> section. The essential tags to look for are og:title, og:description, og:image, og:url, and og:type. If any of these are missing, most checkers will flag them with a warning or error indicator. Pay close attention to the og:image value because this is the single most impactful element for social media link previews; a broken or missing image drastically reduces engagement.
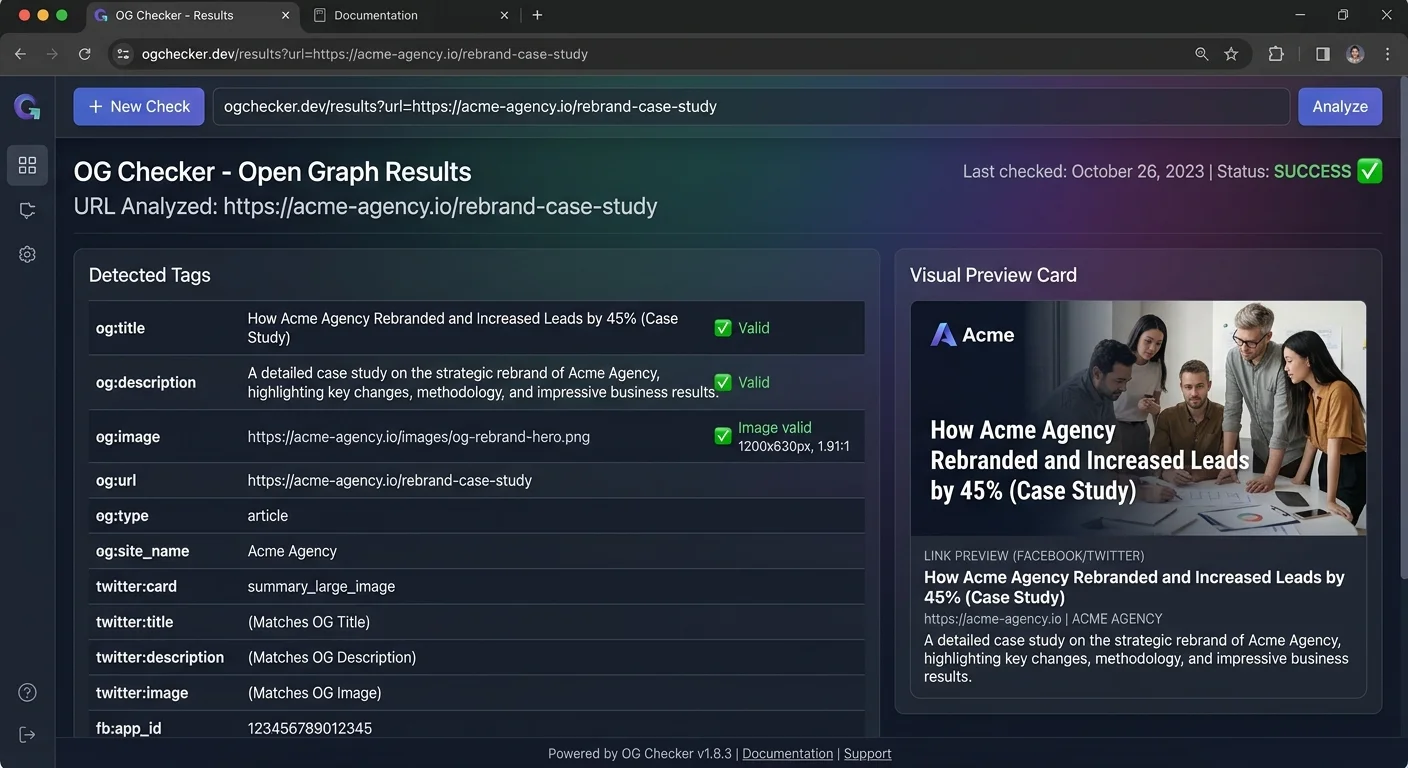
Beyond the basic tags, check for Twitter-specific Card tags (twitter:card, twitter:image) if Twitter is an important channel for your content. Some pages include both Open Graph and Twitter Card tags, while others rely on Twitter's fallback to OG tags. Your checker should show you exactly which tags are present and which are being inherited. At the end of this step, you should have a clear picture of what your page is currently outputting for social crawlers.
Some checkers display Twitter Card tags separately. If yours does not, use Twitter's native Card Validator as a secondary check.
| Tag | Required? | Purpose | Common Mistakes |
|---|---|---|---|
| og:title | Yes | Headline shown in the card | Too long (over 60 characters) |
| og:description | Recommended | Summary text below the title | Duplicating the meta description verbatim |
| og:image | Yes | Thumbnail/hero image in preview | Using a relative URL instead of absolute |
| og:url | Yes | Canonical URL for the shared page | Mismatched with actual page URL |
| og:type | Recommended | Content type (article, website, etc.) | Omitting it entirely |
| og:site_name | Optional | Brand name attribution | Setting it per-page instead of site-wide |
Step 3: Fix Common OG Tag Issues
Now that you have your scan results, it is time to address whatever issues the checker flagged. The most frequent problem is a missing og:image tag or an image URL that returns a 404. Social platforms will not generate a preview card without a valid image, and some will show a gray placeholder that users instinctively scroll past. Open your page template or CMS settings and add the absolute URL to a high-quality image (minimum 1200 x 630 pixels for Facebook, 1200 x 675 for LinkedIn).
Image and Description Problems
Image sizing is a consistent pain point. Facebook recommends 1200 x 630 pixels with an aspect ratio of 1.91:1. Twitter's summary_large_image card works best at 1200 x 675. If your image is too small (under 200 x 200 pixels), Facebook will ignore it entirely. A good practice for developers working on property listing sites or data-driven applications, like those built with a real estate API, is to generate OG images dynamically based on listing data so each shared link gets a unique, correctly sized preview.
Never use a relative image path in og:image. Social media crawlers cannot resolve relative URLs and will fail silently.
Description issues are subtler but equally damaging. Your og:description should be between 55 and 200 characters, written to entice clicks rather than stuff keywords. Avoid duplicating your page's meta description word for word; the og:description is a separate opportunity to craft a message optimized for the social feed context rather than the search results context. If your CMS auto-generates OG descriptions, review them manually because automated excerpts often cut off mid-sentence or include unwanted HTML artifacts.
"A broken OG image does not just look bad; it actively signals to users that the content behind the link is unreliable."
Title length is another common issue. Facebook truncates og:title around 60 to 65 characters, while LinkedIn is slightly more generous. Write your og:title to front-load the most important words, and test it in your checker to see exactly where truncation occurs. At the end of this step, you should have updated your page's HTML head section with corrected or newly added OG meta tags and redeployed to your production environment.
Step 4: Verify Your Fixes Across Platforms
After deploying your fixes, go back to your OG tag checker and rescan the URL. Confirm that all previously flagged issues are now resolved and that the visual preview looks correct. This is the verification step that many developers skip, and it costs them. Social platforms aggressively cache metadata, so even after you fix your tags, the old (broken) version may persist for hours or days unless you actively clear the cache. Running your URL through the checker again forces a fresh fetch and confirms what crawlers will actually see.
Platform-Specific Cache Clearing
Facebook's Sharing Debugger has a "Scrape Again" button that forces a re-fetch of your page's OG tags. You often need to click it twice; the first click fetches the new data, and the second confirms the update. For Twitter, visiting the Card Validator and entering your URL triggers a fresh scrape. LinkedIn has a Post Inspector tool at linkedin.com/post-inspector that serves the same purpose. Each platform maintains its own independent cache, so you need to clear them individually.
Bookmark Facebook's Sharing Debugger, Twitter's Card Validator, and LinkedIn's Post Inspector for quick access during publishing workflows.
Slack and Discord also cache link previews, and they are harder to bust. In Slack, you can sometimes force a re-fetch by posting the URL with a unique query parameter (like ?v=2), though this is a workaround rather than an official solution. Discord caches previews for about 15 minutes before automatically refreshing. Document your team's cache-clearing process so that content managers know exactly what to do after publishing a new page or updating an existing one's OG tags.
Read also Internal Linking Strategies to Boost SEO Rankings
At the end of this step, you should have verified your social media preview across at least Facebook, Twitter, and LinkedIn. The card should display your intended title, description, image, and URL with no warnings. If you maintain a content checklist or QA process, add "validate OG tags" as a mandatory line item before any page goes live. This single addition to your workflow prevents the most common social sharing failures and protects the click-through rates your content team works hard to earn.
Frequently Asked Questions
?How do I clear a platform's cache after fixing my OG tags?
?Is Facebook's Sharing Debugger enough or do I need a separate checker?
?How long does it take to audit OG tags across hundreds of pages?
?Does testing a staging URL give accurate OG tag results?
Final Thoughts
Validating your Open Graph tags is a small investment that pays off every time someone shares your content. The four steps covered here (choosing a checker, running a scan, fixing issues, and verifying across platforms) form a repeatable workflow you can integrate into any publishing process.
Treat your OG metadata with the same rigor you give to on-page SEO; the social feed is a search engine in its own right. Build the habit now, and your link previews will consistently drive the traffic your content deserves.
Disclaimer: Portions of this content may have been generated using AI tools to enhance clarity and brevity. While reviewed by a human, independent verification is encouraged.